


Introduction
As web applications begin housing increasingly important and sensitive information, ensuring the security of user data and user accounts is paramount. User authentication is the process of verifying the identity of a user attempting to access an application or service. To protect user privacy and maintain security, it is essential to implement a robust authentication system.
OAuth stands for "Open Authorization" and is a popular and secure way for applications to access resources on behalf of users, without exposing their sensitive information. This method of authorization not only increases security but can also enhance user experience when users want to use third-party applications.
Understanding OAuth
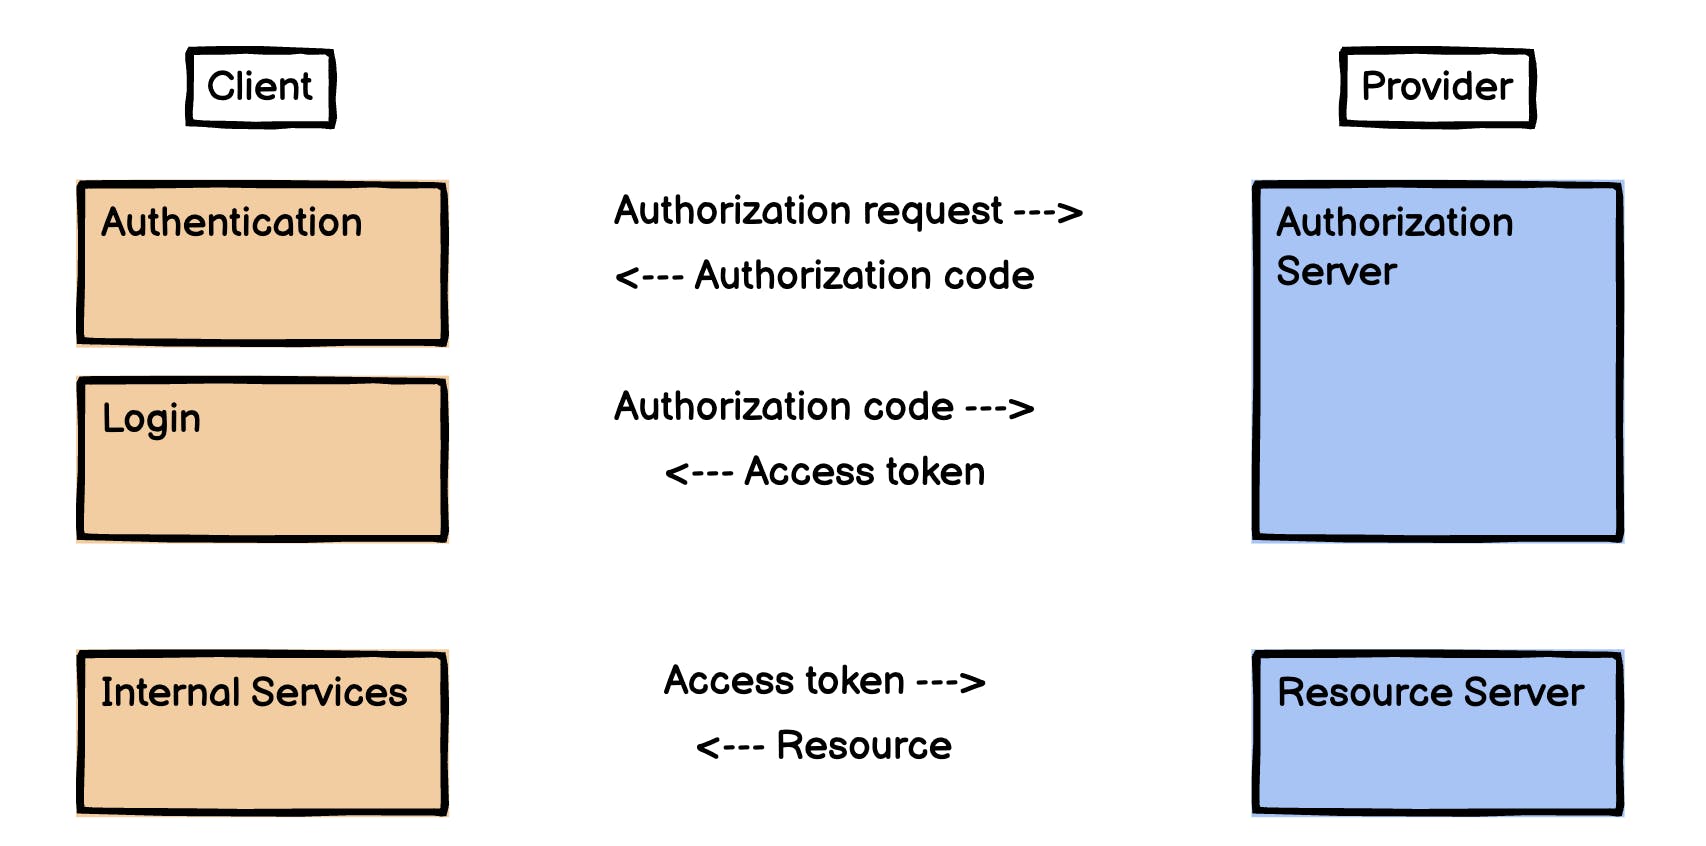
An OAuth service provider, like Google, is a 3rd party system that provides access to the identity of the user through the Authorization Server and API access through the Resource Server to a client. This is done through Access tokens which are issued to the Client. The general flow of authentication goes as follows:
User Authorization Request: A user initiates the request by logging in to a service provider, like Google, through a client, like a React Application.
Authorization Code Issuance: If the user's login credentials are valid, the Authorization Server will issue an Authorization Code. With this code, the user is authenticated with the React Application and a new account(user instance) may be created in the backend database.
Access Token Generation: When a user logs in an access token is issued using the stored Authorization code. These tokens are regularly updated or refreshed to ensure security.
Token Usage: The access token can be used for internal services, like linking user information from Google to your React Application.
Why Use Google OAuth?
Think about all of the applications you use daily. Spotify to listen to music, Instagram and Facebook to see what your friends are doing, or Google to set up a meeting, check emails, etc. Each of these applications employs its own OAuth authentication system. By integrating these different authentication methods, applications, and users can gain access to a variety of information from photos to meetings on a calendar. While most applications utilize OAuth, Google is unique in its enhanced security and broad applicability.
Unlike more niche or specialized platforms like Instagram or Spotify, if your app requires more broad information, Google can allow applications to access a user's email, calendar, documents, etc. Although, that isn't to say you can't implement multiple authentications from various applications. In addition to more applicability, Google has a robust security system that protects against unauthorized access. Enabling Google login, streamlines authentication, without compromising security.
Google OAuth also allows developers to request specific permission, allowing applications to only access necessary information. Ultimately the implementation of an OAuth system reduces friction in the adoption of your application.
Google OAuth Authentication Flow
Now that we have gone over why Google OAuth is a great choice, let's look at how the general OAuth flow would work specifically for a React Application and a Flask backend.
User Interaction:
- A user interacts with your React Application and initiates the Google OAuth process. This is usually done by using and clicking on Google's "Sign in with Google" button.
Authorization Request (Frontend):
The user is redirected to Google's login page, where they enter their credentials, specifically for their Google account. If Google's Authorization Server validates the login, the server will send back an authorization code to your React Application
The authorization code will be issued as a JWT id_token that is a string.
Authorization Request (Backend):
- The Flask backend will verify the authenticity of the id_token with Google's public keys. The id_token contains information about the user, specifically from the data they provided to Google. This access token is important for authenticating subsequent requests to Google services.
Practical Implementation with React and Flask
Setting up the React Frontend
Now that we understand how Google OAuth works, let's jump into the actual code you can use to get started! Before starting anything, you need to create a React App frontend and Flask backend to handle authentication and interact with Google's OAuth services. This blog will not go into detail on how to do so, but check out these resources to get started:
IMPORTANT NOTE:
- At the time of writing this blog, my application was using React v18.2.0 and Flask-SqlAlchemy v3.0.3. Furthermore, due to changing policies regarding third-party cookies, Google's OAuth protocol is constantly evolving. Therefore, this code may be using a deprecated version of Google OAuth 2.0.
Integration of Google Sign-In API in React
Generate Client ID:
- I utilized Google's Identity Services to build my sign-in feature in my React application. To get started, you need to visit Google Cloud Console to generate an OAuth Client ID. Google provides a fairly comprehensive guide on how to get started here.
Store Client ID in .env file:
- After generating a Client ID, you want to create a .env file and store this ID inside a variable. I called mine "REACT_APP_GOOGLE_CLIENT_ID." This variable can be accessed throughout your React application using the following code.
const clientId = process.env.REACT_APP_GOOGLE_CLIENT_ID
Add Google API Script
- Within your public/index.html file, you need to include the Google Sign-In API script. Within Google's documentation, they recommend including it at the end of the <head></head> like this:
<script src="https://accounts.google.com/gsi/client" async defer></script>
If you are having issues with loading the Google script and running into errors with asynchronous versus synchronous functions, you can also manually load the Google API script and initialize the Google Sign-In like so:
useEffect(() => {
    /* global google */
    const loadGoogleScript = () => {
      return new Promise((resolve) => {
        const script = document.createElement("script");
        script.src = "https://apis.google.com/js/platform.js";
        script.async = true;
        script.defer = true;
        script.onload = resolve;
        document.head.appendChild(script);
      });
    };
    // Load the Google API script and then initialize
    loadGoogleScript().then(() => {
      initializeGoogleSignIn(); //defined in the next block of code
    });
  }, []);
Google Initialization
- After loading the Google API script, you need to initialize the Google Sign-In and generate the Google Sign-In button, that users will use to make an Authorization Request to Google's Authorization Server. This is the way I did it in my application:
const initializeGoogleSignIn = () => {
  if (window.google && window.google.accounts) {
    window.google.accounts.id.initialize({
      client_id: clientId, // Add your own client ID obtained from Google Cloud Platform
      callback: handleCallbackResponse,
    });
  } else {
    setTimeout(initializeGoogleSignIn, 100);
  }
};
Let's go over what is happening in this code. First, the function checks if the 'google' object and 'google.accounts' object are available in the global window scope. This is to make sure the necessary Google API libraries are loaded before attempting to initialize Google Sign-In.
Then, if the necessary Google API libraries are available, the Google Sign-In API is initialized specifying the client ID obtained from Google Cloud Platform and the callback function that will be used when the user completes the Google Sign-In process.
Since I was having issues with synchronicity, I also included the hook setTimeout which executes a recursive call to my initialization function after a short delay, to allow the Google API libraries some time to load.
Google Sign-In Button
- The Google Sign-In button can be initialized anywhere within your code. Although most examples will show it included in the initialization, you can render this button in a component that best suits your needs. For my particular use case, I rendered the button inside my login.js component.
  useEffect(() => {
    window.google.accounts.id.renderButton(
      document.getElementById("signInDiv"),
      {theme: 'outline', size: 'large'}
    )

  }, [])
This code ensures that when the component mounts, the Google Sign-In button will be rendered. To visually place the Google Sign-In button in a way that best suits your needs, you can simply set an ID (above I used "signInDiv") and then access this anywhere in your application. In the previous version of Google Sign In, you could personalize this button, however, that has now been deprecated. There are more manual ways to personalize this button, and this blog goes into depth on how to do so.
Sending the id_token to the backend
- After a user signs into their Google account, Google OAuth sends back a response that contains the authorization code as a JWT id_token that is a string. A request needs to be fired to your backend, sending the id_token for further processing.
const handleCallbackResponse = (response) => {
    fetch('/googleauth', {
      method: "POST",
      headers: {
        'Content-Type': 'application/json',
        'Accept': 'application/json'
      },
      body: JSON.stringify({ id_token: response.credential }),
    })
      .then(r => r.json())
      .then(user => {
        //navigate to a protected route
        //use context to set the user
        //etc.
      })
      .catch(err => {
        //error handling
      })
Flask Backend Integration
Import Necessary Libraries
- To verify my data, I used Google's OAuth2 token verification method. This requires the installation of google-auth.transport and google.oauth2 package.
from google.auth.transport import requests
from google.oauth2 import id_token
Resource Initialization:
- I also used Flask-RESTful to build this backend route, which allows me to handle HTTP requests.
Google OAuth Verification:
From the front end, the back end receives the id_token. This token is a string. Although the verify_oauth2_token method accepts a string, I encountered some bugs, so I needed to convert this id_token from a string to bytes.
After this conversion, The token is verified using Google OAuth's verification method, and the information about the user contained in the token is stored in the variable id_info. This information can be used to either query the database to see if a user exists or create a new user instance.
class GAuth(Resource):
    def post(self):
        try:
            # get data from google id_token
            data = request.json
            # data is sent back as a dictionary
            token = data.get("id_token")
            if not token:
                return {"error": "Missing ID token"}, 400
            # convert from string to bytes
            id_token_bytes = token.encode("utf-8")
            # verify and get information about the token
            id_info = id_token.verify_oauth2_token(
                id_token_bytes, requests.Request(), CLIENT_ID
            )
            #query the database to see if the user exists in the database
            #if the user exists login, otherwise register a new user
Conclusion
Implementing Google OAuth in your React-Flask application will enhance security and streamline the authentication process. This will provide a more user-friendly experience and reduce friction in your application. By leveraging Google's OAuth service, you can utilize some of their robust security measures and easily access additional information about your user, to personalize their experience on your application.
If you decide to implement Google OAuth in your application, it is important to note that user authentication is constantly evolving to meet best practices and new standards. Regularly check Google's OAuth 2.0 documentation and other helpful blogs to stay up to date on any new changes that may impact your application development.
If you want to see a more complete example of how to implement Google OAuth into a React-Flask application, check out my website TEA Culture, and my GitHub. I included some additional resources below for the current systems that are being used. Good luck coding!
Additional Resources
Example Code: https://github.com/tianalopez/teaculture